Object Pooling

A project in which I experimented with object pooling.

This article focusses entirely on the programming experience I gained from this project and does not involve any design.

Short Summary

In the summer of 2020, I decided I wanted to experiment with object pooling. Our projects at school usually involve focusing more on creating a finished product rather than optimising our work, so I've never really found a good moment to create and implement an object pooling system.

To test and visualize the system, I created a simple showcase scene that consists of multiple intersecting traffic lanes filled with recklessly driving cars.

Additionally to the Object Pooling system, I played around with manipulating time (in-game, not in real life) and tried out a different way of structuring my code.

Quick overview of results

Tòngkǔ

Created an object pooling system that can be used in the inspector

Mobirise

Created a dynamic script for 3D audio that can be pooled

Mobirise

Experimented with rewinding objects in time

Mobirise

Experimented with a new way of controlling script execution order 

This page is a work in progress and currently doesn't contain any information about the 3D audio script and the time rewinding mechanic. I plan on writing about these in the future so stay tuned!

Let's talk about the code

Creating a dynamic object pooling system

The first time I heard of Object Pooling was during my previous education; Game Development at GLU. I implemented it by copying someone else's system, without really understanding what I was doing.

Over the years I learned more about it, so when I decided I was going to create the system again, I had a much better understanding of how it should work and what it should accomplish. I refreshed my memory by looking at some C# examples and went straight to work after feeling confident that I could do it for real this time.


I started off by creating the "Pool" class. It holds all the information the system needs and can be adjusted per pool.

Each pool has a string that serves as a unique Key which the system uses to differentiate between pools. Additionally the pool stores 2 GameObjects: the prefab that is used to instantiate the object and a reference to an optional parent object.

Finally, the Pool stores its size and has a boolean that allows it to expand beyond its given starting size when set to true (I'll go into more detail about this later on).


Next up was creating the "PooledObject" class. The PooledObject is what we use to store the actual instantiated GameObject. It also stores a reference to an interface called "IPooledObject". This interface is a requirement for each GameObject that needs to be pooled.


The interface keeps a reference to the ObjectPool class so it can despawn itself if needed. It also stores the key of the Pool that the GameObject originates from, so the system knows which Pool to call when dealing with the PooledObject.

Lastly, the interface includes two methods.
OnObjectSpawn() and OnObjectDespawn().

OnObjectSpawn gets called directly after the object is spawned/activated and, unsurprisingly, OnObjectDespawn gets called directly before the object is despawned/deactivated.

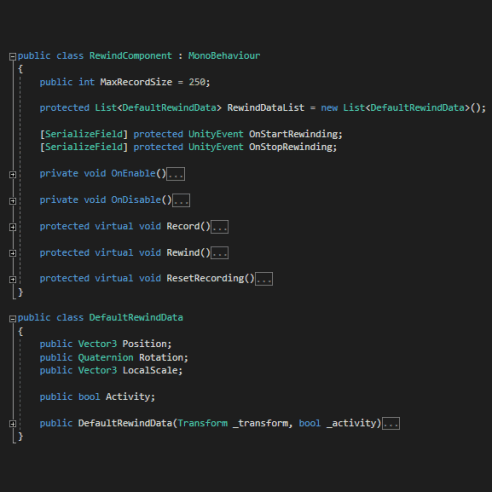
Finally, I got to creating the class that controls the entire pooling process, the "ObjectPool".
It's just under 200 lines of code, so I won't be going over everything that's in there, but I'll explain enough to convey how the system works.

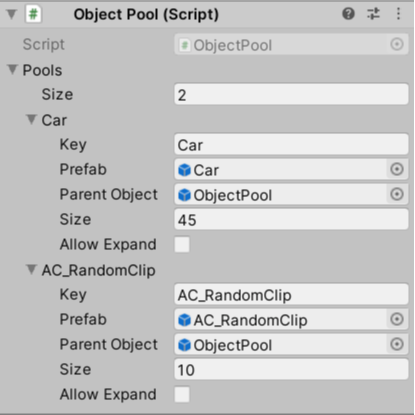
Let's start from the top. The ObjectPool class only holds a few variables. It stores a list called "pools" that contains all the Pools. We use this list in the inspector to easily edit the pools.

Apart from the list, the class also stores a Dictionary which holds Lists of PooledObjects, along with their corresponding Key. This is where we store the instantiated objects so we can modify them later on.

On start, the ObjectPool class runs through the list of Pools and creates PooledObjects according to their given starting size. The objects are immediately deactivated. From here on, there are two public methods that can be called by external classes: SpawnFromPool and DespawnFromPool.

DespawnFromPool deactivates a given PooledObject so that it can be reused by the system.
SpawnFromPool activates a PooledObject from a given Pool and applies the given values to the object. If the SpawnFromPool function can't find a deactivated object within the Pool, it can expand the pool, but only if the boolean "AllowExpand" is set to true. If this is the case, the ExpandPool method will be called. This function simply instantiates an additional object to populate the list of PooledObjects of the given Pool.

Further down this page, I will explain how I implemented the ObjectPool into the scene.

Taking control of script execution order

During my first 2 years of HKU, I talked a lot with our programming teacher, Valentijn. He once showed me a way of programming that I had never tried before and suggested that I should try it sometime. While working on object pooling, I thought it would be the perfect opportunity to finally try the method he was talking about.

I'm not quite sure what the official name for this method is, but what it comes down to is that you have one overlooking class that stores a reference to all other big systems and manages in what order they are being called. Let's call it the "Overlooking Executor Method" (or OEM for short) to avoid confusion.

Using the OEM method allows us to have a clear oversight over what exactly happens in our code, when it happens, and what causes it to happen. The downside is that everything becomes dependent on that one overruling class, which prevents us from using the (sub)classes separately and independently.

This is how I implemented the OEM method in this project. I've created a "GameManager" class that serves as our overlooker. It stores references to all relevant classes and makes use of a very crude singleton implementation for easy access.

Unity uses a few methods that are called every frame like Update and FixedUpdate. These methods are usually called independently on classes, but by using the OEM method, we let the GameManager take full control over calling these functions. We do this by giving the GameManager a System.Action for both the Update and FixedUpdate method called OnUpdate and OnFixedUpdate respectively.

Now, if we want a subclass to use the Update method, we instead create a public method called "OnUpdate". Then, in the Start method of the GameManager, we add the OnUpdate method of all subclasses to the OnUpdate Action and invoke this Action in the actual Update method.

What's nice, is that, because we add all these OnUpdate methods to the Action one by one, we get a very clear overview of which method gets called first. This can be very useful when working with classes that are circularly dependent on one another.

Apart from methods that are called each frame, we can add an OnStart method to each subclass that needs it and call it in the actual Start method. In the GameManager script, you'll see that I've used these methods to include references to the other subclasses where needed, which then store them in variables. Having our GameManager class communicate references between subclasses keeps referencing other classes clean and clear to understand!

Implementation of both the ObjectPool & the Overlooking Executor Method

To test both systems, I've created a scene with multiple intersecting traffic lanes, filled with cars that are pooled by the ObjectPool and that subscribe their OnFixedUpdate function to the GameManager instead of having their own FixedUpdate method.


This is how we implement the Overlooking Executor Method to our car. We create a method and call it OnFixedUpdate (this could actually be called anything, but by giving the method this name in each class that wants to incorporate it, we can easily identify the functions that are handled by the GameManager.)

In th
e OnEnable method, we subscribe our new function to the OnFixedUpdate Action of the GameManager, and when OnDisable is called, we unsubscribe from the Action.


To convert the car class into a PooledObject we supply it with the IPooledObject interface, which requires us to implement the members of the interface. We now want our car to be destroyed when hitting something, so once we've checked for collision, we use the reference to the ObjectPool to call the DespawnFromPool method. We input our Key and GameObject and voilà, we're all done!

As you can see, we have also added some functionality to the OnObjectSpawn function. We want the car to change to a random colour each time it "spawns". Normally we'd just call this in the Awake or Start method, but since those only get called once when the object is created, we need to use our OnObjectSpawn method instead!

All in all, this was a really fun and educational side-project! I've successfully created an ObjectPool and experimented with a different approach on handling code!

Final Result!

Object Pool

HTML Generator